FREE shipping for all orders above R1000
0 Cart
Added to Cart
    You have items in your cart
    You have 1 item in your cart
      Total

      Guides — Red-e

      Microadventure To Secret Falls

      Microadventure To Secret Falls

      The sun was up and my cats and I were safely tucked away in bed. I had overslept. In an attempt to not be so hard on myself anymore, I shrugged it off.  I had packed the night before and was super chuffed to see 9 kg of gear (minus the cats) squeeze into my Adidas backpack. I had been shopping around for a suitable pack, but hadn't yet found "the one".

      I was pretty nervous as I pushed my bike outside and waited for my Garmin 310XT watch to pick up satellites. I would be on my own, cycling 70 km from Malmesbury to Secret Falls (www.secret-falls-tulbagh.com/), north of Tulbagh, for the weekend and fingers crossed I wouldn’t forget anything major or have any issues with my bike. I still didn't feel comfortable dealing with punctures, broken chains and the like.

      The first kilometer was a happy descent, but as soon as I hit level ground and started pedalling, panic set it – sitting on a seat with 9 kg on my back was not a good idea and no amount of anti-chafe would relieve me from the effects of a point load applied to the seat. I would just have to suck it up.

      It was tough going up Bothmaskloof Pass out of Malmesbury to Riebeek Kasteel, but I was enjoying the familiarity of the Swartland farmland that I had become accustomed to during the past few months of living out here in the sticks.

      At the top of the pass a group of riders who I recognised from the Malmesbury Cycling Club passed me and we had a quick chat. It immediately lifted my spirits. They went down a steep gravel section but I was still familiarising myself with riding with a pack, so I opted for the road down the pass into the beautiful valley.
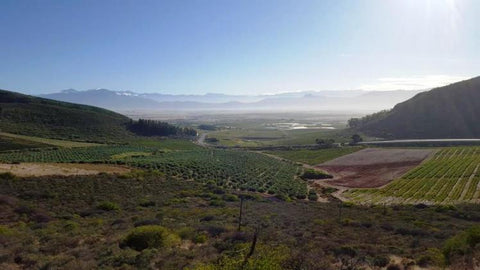
                              

      Earlier in the week a colleague had convinced me that after Riebeek Kasteel it was pretty much flat riding to Tulbagh, but it seems it was only an illusion created by sitting in the driver's seat of a car. The feeling of freedom while cycling through the countryside was indescribable. Carrying everything I needed in my backpack, I just wanted to keep going. And then I hit Nuwekloof Pass just before Tulbagh. 

      I distracted myself by studying the pass and looking over to the old road beneath the railway line. It helped and pretty soon I was flying down the other side.

      Fifty something kilometers from home I arrived in Tulbagh with cramping legs. I swallowed 5 Cramp-Eaze capsules. All I wanted to do was sit down. So I stopped for breakfast at the very first place I saw – The Patriot Restaurant at De Oude Herberg in Church Street. They make delicious omelettes and the best freshly squeezed GREEN (as opposed to browny gold) apple juice. It seemed to do the trick and the cramps abated.

      At this point I thought I only had a few more kilometers to go and then a little hill up to Secret Falls. It turned out I would go on to do another 20 km and gain a further 600 m of elevation, to give a total of 1100 m of ascent for the day (Nothing phenomenal, but way more than the little bits of riding I had done in the past). Thank goodness I didn't realise it at the time.

      From the entrance gate at Secret Falls it’s a 4 km cycle to the campsite. The first section passes through fruit orchards with giant, tempting, tasty looking pears. If you are in a car, you need to leave your vehicle at approximately halfway and jump into a friend’s 4x4 or carry your camping gear for 2 km, which includes a brutal climb near the end. 

      This picture really doesn't do the climb justice and it almost looks like a downhill! The whole experience was pretty traumatic; I had no idea how far to go before reaching the campsite and it was never where I thought it was. There were always more gates to go through. The feeling was akin to running the end of a trail race with poor route markers when you are already exhausted and you want to strangle the race organiser, cry and lie down on the ground all at the same time. 70 km later I pulled into the campsite on the slopes of the Winterhoek West Mountains.

      It was all worth it. Secret Falls was the most beautiful camp site that I had ever seen, with picturesque views for miles over the valley and a pool from which to take it all in. With only 9 campsites, they are currently fully booked until May 2016 (keep an eye on their website for cancellations).

      The owners take no nonsense and state upfront that they only want campers who don’t moan and groan about things. They also ask that you take your rubbish home with you. The vibe was really chilled and quiet with awesome people. I was invited to have dinner and breakfast the following morning. I declined because I needed to lighten my own load, but I had great conversations with other adventurous outdoorsy people. Travelling solo has always been a positive experience.

      There are four trails on the property. After arriving at the campsite I did the short 30 min out and back Waterfall trail. The waterfall was only trickling this time of year, but the trail is nice and foresty. You can link up with the much longer Baboon trail that loops down to the cottages and back up to the campsites. I had accidently hauled my bike up part of the steepest section of the Baboon trail when I took a wrong turn from the dam on my way up. It was too much for me for one day, but without a bike I imagine it's a lovely hike. 

      Setting up camp was so much fun and my Vango solo tent was a lot bigger than I expected and really easy to set up. 

      It was a cool night, but I was nice and toasty inside my First Ascent Down Sleeping bag wearing my Vivolicious tech tights (www.vivolicious.co.za). I usually don’t take expiry dates too seriously because most things tend to last a lot longer than stated on the packaging. Unfortunately, the same cannot be said for my pink salmon in a sachet that expired in June 2014. It was an epic fail, but I polished off some mushroom risotto which I cooked on my CampingGaz cooker and drifted off to sleep while reading a book about the history of Tulbagh.

      The next morning, after watching the sunrise over a cup of coffee I set off along the Leopard trail to the waterfall. From the Leopard trail you can continue along a longer trail to the top of the mountain. I would be coming back later in April to do the route with some friends, so I just wanted a little taster. It looked good and I’m looking forward to getting to the top of the mountain.

      I broke camp and was again amazed at how everything could fit into one little backpack. It didn’t seem like I needed much else. Having an entire house filled with so many things suddenly felt very unnecessary.

      The Red-E 4500 MAH Powerbank that I had received for Christmas came in really handy. I charged my Samsung S6 once fully and while packing up, I realised that there was a USB port from which I could charge my watch while cycling.

      I took it easy on the ride back home and reflected on the adventure…the fear that I had in the beginning and the freedom of venturing out on my own and riding off into the unknown. It was all just brilliant. I often struggle to explain it to most people, but when I speak to other solo adventurers their eyes light up in mutual understanding. To celebrate…and because I simply could not sit on that saddle for one more minute...I stopped for pancakes (salmon, cream cheese and pesto) in Riebeek Kasteel.

      My seat had become a fiery furnace and it got incredibly tough towards the end. Tough in the way that I had become accustomed to during endurance events. When your body doesn’t really want to play along, but your mind is so determined that it will absolutely not consider giving up. It’s in that space where I thrive - when the going isn’t necessarily fast, but I feel incredibly alive and acutely aware of the fight within me. It’s moments like this when I am most grateful for the life that I have.

      After 2 hours of riding into a headwind and 6 km from home I pulled off and sat down on the side of the road slowly eating my M&Ms. I had been saving them for a possible moment of despair and the mouthfuls of nutty-chocolateyness made me feel much better. I headed up the long climb, reluctantly accepting the reality that my weekend adventure had come to an end.

      Follow Taryn on: InstagramTwitterWebsite

      The 5 best training climbs around Johannesburg and Pretoria #2

      The 5 best training climbs around Johannesburg and Pretoria #2

      By Tuks Cycling Team

      With the summer steadily approaching, a lot of cyclist in the area are starting to dust off the cobwebs from their bikes and getting back into shape. With the second part of the racing calendar kicking off at the end of August, we have identified a very well balanced climb to help you work on those sustained climbing efforts. These efforts will help stay with the pack when the race starts going uphill and make sure you have enough power for the attacks at the top of the climb.

      “Cycling doesn’t get easier, you just get faster” – Greg LaMond

      Klapperkop climb is one of the most ridden climbs in the Pretoria area with more than 1000 people riding the climb each day. It is a very well balanced climb and makes sure that you work on your sustained efforts throughout. The climb in full, from the bottom cattle grid at the entrance to Klapperkop nature reserve, up to the top of the climb is just over 3,7 km long. The average gradient is just over 3% but this is very deceiving seeing that there is a 250m downhill section halfway through. The climb starts off with quite a steady section with an average gradient of 5,5% and works its way up to a steady 7%.

      The Tuks Cycling team uses this climb quite often, especially when training for longer climbing efforts. The total time for the climb ranges between 7 and 9 minutes and is ideal for the longer climbs in races such as the 94.7 Cycle Challenge. We usually do between 5 and 10 repeats on this climb with a couple of minute’s recovery in between each interval.

      Please see below the detailed breakdown of the Rose Avenue climb (map, profile) and our video dairy made during a training session on Rose Avenue.

      I trust that you enjoyed our first and second Blog Post in this series! Please come and have a look at next weeks post. You can also follow the team on social media for updates and pictures.


      Klapperkop – Climb breakdown:

      • Maximum Gradient: 7,5%
      • Average gradient: 3%
      • Climb length: 3,7km
      • Surface: Tar surface throughout the climb
      • Surface quality: 8/10 Perfectly smooth tar, a couple of potholes at the foot of the climb
      • Lighting: No lighting installed on climb
      • Best time to train: First light of day up to 5 pm
      • Overall rating: 8/10

      Klapperkop – Street map

      Klapperkop – Profile

      Klapperkop - Video Blog

      How to: Night Mode shooting with GoPro Hero 4

      How to: Night Mode shooting with GoPro Hero 4

      By Jacques Viljoen

      When I first used my GoPro Hero 3 Black I was bowled over. I couldn’t comprehend how such a small camera, can capture such amazing quality video. I wanted to record everything I do with it because I just could not get enough of it. There simply wasn’t enough time (and memory cards) in a day to record everything that happened. After one late afternoon mountain bike ride, I discovered one of the GoPro’s Achilles heels. It did not like recording in low light situations. Even with just less-than-ideal lighting, the video became grainy and adding artificial light was also tricky, as it had to have gradual light, like the type you find in a studio.

      So when they announced the release of the Hero 4 Models that had improved 'Auto' Low-Light capabilities, I was a very happy guy to say the least. They also added a Night mode to the photo settings.

      I will admit, you will need some practice before getting that perfect night time photo. A good way to start is to take the same photo more than once, with the different settings to see what works best for you in different situations.

      Protune is also now available for photos which allows you to set various parameters such as White Balance, ISO limits and more. Since this guide is about using night mode I won’t be using Protune in any of the photos.

      The part that makes the biggest difference to photos in night mode, is the shutter speed. The following shutter speeds are available:

      Shutter speed / What to use it for: 

      • Auto - Sunrise, Sunset, Dawn, Dusk, Twilight, Night
      • 2 Seconds, 5 Seconds, 10 Seconds - Daw, Dusk, Twilight, Traffic at night, Ferris wheel, fireworks, light painting
      • 20 Seconds - Night sky (with light)
      • 30 Seconds - Night stars, Milky Way (complete darkness)

      Watch this video to see how to get to night mode on your GoPro Hero 4:


      Or follow this step-by-step guide:

      • First, switch on your camera and go to photo mode
      • Press the settings button on the side
      • Once you’re in the settings menu, press the shutter button until “Night” appears. You will notice that the menu layout has slightly changed, bringing in the shutter speed menu.
      • Press the mode button to move down to the shutter speed.
      • Press the shutter button to select the required shutter speed depending on the application.
      • Once you selected the desired shutter speed, press and hold the Shutter button to return to the main screen.

      I found that the shutter speed set at 2 Seconds is a good ‘go-to’ mode.


      Here are some examples of photos I took using Night mode:


      One of my favourite features to use Night mode for is called light painting. If you are the creative type then you can have a lot of fun with this mode.


      Here are some examples:


      And this next one is by far my favourite:


      Some quick tips for Night mode photography:


      • Choose the right shutter speed. If the shutter is open for too long, it will let in too much light, resulting in over exposed photos, which does not look nice.
      • Always have the camera resting on a solid non-moving object. For most of my photos I used a tripod, but a chair, table or rail will work just as well, depending on where you are. Even slightest movement, as I discovered to my frustration, will result in blurriness.
      • Night mode is not ideal for capturing moving objects (apart from light painting). If you for example try to take a photo of yourself running, you will look transparent and blurred at the same time, much like my arm in that one photo.


      I hope this guide helps you to get that perfect shoot.

      We would love to see what photos you guys can create. So tweet me your photos using the following handles: @ActonGearSA and @jacquesv569 pop in #NightMode and we will put together a blog featuring your photos

      How to Plan a Group Biking Trip

      How to Plan a Group Biking Trip

      Written By Thato

      Experiencing our beautiful country via road tripping is a breath taking experience not many South African get to have. With vast sea like valleys, long winding dirt roads or the odd looking mountains tops, South Africa has some of the world’s best scenic routes. Now if you add the element of open motor bikes and a few biking club buddies, you have yourself a road trip worthy of ‘Harley Davison Club’ status.

      But Harleys aside, there are a few things you will need to do before you can get out to hit the open road.

      Remember that unlike a car, motorbikes have limited storage space. You will have to decide exactly what you want to take and what you will need. Good questions to ask yourself are, how long will I be gone? Where do I indent to go? What type of accommodation will I make use of? How many people are coming with me?

      Baggage


      Unless you are a proud owner of a touring bike, you will probably need to have a set of saddle bags (and backpacks don’t count) or a tank bag to carry your stuff in. You can choose the option of hard case or soft case bags. Hard cased bags offer much better weather protection but are harder to install. A good option is the ATG Overlander, which is 100% waterproof and durable but is also light weight and foldable.


      How many people are coming with you?

      Have a list of the people who are coming with you. This will help you keep track of all the participants and will also help you add fun activities for a larger group of people to do. Add a section with everybody’s connected details and details of people to contact in case of an emergency.

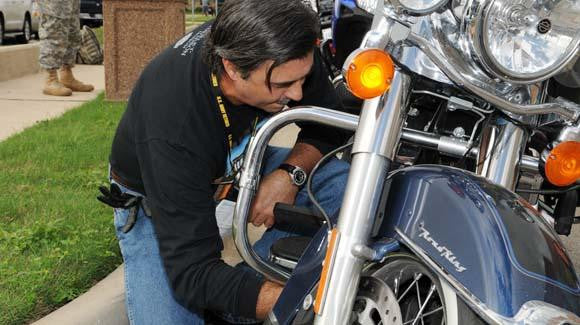
      Check your bike

      Next you will need to do an inspection of your bike. The Motorcycle Safety Foundation recommends the T CLOCS guidelines.

      • Tires – Make sure that your tires are properly inflated by using your air pressure metre or one made available at a filling station.
      • Controls – Make sure that your clutch and brake cables are working.
      • Lights – Check that your headlights, taillights and indicator lights work correctly.
      • Oil – Check your oil and cooling fluid.
      • Chassis – ensure that your frame, chain, suspension and fasteners are all in working condition.
      • Stands – Make sure that your bikes stand is not cracked or bent and that the springs work correctly.


      Communication


      Being able to speak to your fellow riders is a great way to add an extra fun element to your trip. A biker to biker communication headset will help you quickly relay details to your co- riders. A good option is The Cardo G9, which allows you to connect and speak to up to 9 other riders (4 rider, cross-communication). Another one is the Scala Rider Q3 which also has built in FM radio and GPS audio out.


      Packing


      Packing all the right items without over stocking can be tricky. A good idea is to make use a good touring suit that can keep you comfortable during your rides. Pack a good selection of thin clothes rather than heavy, bulky clothes. Its far better to stop and add layers of clothes than to sweat through what would otherwise be a fun, scenic route ride.

      When packing your saddle bag, remember to but heavier, more solid items at the bottom, with lighter items at the top. Roll your clothes instead of stacking them to save space.

      Because you’re riding in a group, comparing packing lists to see if you have duplicate items that you can save space on. If your traveling will your ‘special someone’ ask yourself questions like, can we share toothpaste or shampoo?

      Be sure to pack energy drinks and snack bars in case you find yourself far from any store during your trip.

      Action Tip! : Zip lock bag also offer you an excellent way of organising smaller items in your sable bag.

      Ride using a full faced helmet. Not only because they more protection and safety but they also offer more protection against rain and cold winds. A well ventilated helmet will also give you some comfort in warm weather too.

      Though it's tempting to hit the open road and simply follow your nose, don't forget that you're more vulnerable to the elements, fatigue, and potentially serious injury on a motorcycle. Prepare yourself with clothing appropriate for the weather. Plan a route and, if you don't have a portable GPS system, do whatever it takes not to get lost, even if it means taping directions to the top of your fuel tank.