FREE shipping for all orders above R1000
0 Cart
Added to Cart
    You have items in your cart
    You have 1 item in your cart
      Total

      Guides

      Wingsuit Base SA

      Wingsuit Base SA

      Since I could remember, I always had the dream of flying. When I was a little boy I used to tell my mom that I would be pilot one day, and when I turned 18 years old that dream became real as I obtained my Private Pilot’s license. Now 12 years have passed and my views have totally changed about flying, I know that when I was a kid I always wanted to fly, so I became a pilot, and then I discovered skydiving, and that totally changed my view of flying... I realized that this was the way I’ve always dreamt of, see flying a plane is fun, but it’s still a machine, and controlling the wind with your body and movement is just incomparable…

      I’m lucky enough to have a few friends that live on the edge most days and spend their time jumping mountains all around South Africa, and also the main reason why I started skydiving. Becoming a wingsuit pilot takes years of experience, and to be honest most wingsuit jumpers make it look easy, I mean what could be so difficult than to just leap of a mountain? Well as I learned more and more about the sport I realized that it was going to take total dedication to get there, see Wingsuit Basejumping is like no other experience in the world, it’s the biggest game you will ever play on your own mind, convincing yourself that you have the skills and ability to do it while standing on the edge of the world and believing it, and it’s also not something just every person can go out and do, like to do a tandem skydive, you can go to you closest skydiving club and go experience that, but with wingsuit basejumping it takes hours of wingsuit skydiving first, and we all know that hours in skydiving can stretch to years depending on what dropzone you jump at.

      So as you can clearly see it would take a few years to get there, but when you do, you taste the purest form of being alive as you can only imagine, and when you reached this point where you can actually fly off a mountain with your wingsuit, that’s when the mountain becomes a playground. I’ve seen wingsuit basejumpers mould the earth to do just what they want purely by flowing over it. The closer they fly, the more intense the experience becomes, this activity is called Wingsuit proximity flying, where basejumpers plan a line which will allow them to pass close to fixed objects or the ground at high speeds, and choosing the wrong line or miscalculating margins can result in serious injuries or death.

      Jumping as much as you can is key, it’s almost like not exercising for 2 weeks, you become lazy and forget things, so the more you do it, the better that reaction response time will be when you really need it, and trust me when things go wrong, they go wrong super quick. After all, basejumping is the most dangerous activity in the world, unless you swim in lava everyday… ;)

      Now for the good stuff! Click on the following link to see a video about a mission we did to the Drakensberg, we set out on an epic adventure to go basejump and speedfly Cleft Peak. In this video you will get a taste of what it’s like to Wingsuit Basejump. 


       Stay tuned to this blog post as I will be talking more about Speedflying and Basejumping in the upcoming weeks. 

      Velobeing - Vlog

      Velobeing - Vlog

      By Jacques Horn

      For some, cycling is a very rewarding and entertaining past time activity, for others it provides a mean of transport. For me as a professional cyclist it offers the opportunity to look at my life from a very different angle than what the typical 23 year old student would. This is my first vlog post and I am planning on taking each viewer through my daily life from cycling training, commuting on my single speed - which I built myself – and the everyday life events as experienced by ME. I absolutely love my GoPro and take it everywhere I go because you never know what could be around the next corner or over that little hill in front of you. In this video I take you through my daily commute to my student job – I teach spinning classes at local gyms – as well a typical training ride with some of my fellow cyclist friends that live in the Pretoria area. We have fun whenever we go for rides and I hope that watching this vlog will provide you with the same amount of pleasure that I got from making it! 

      Keep your eyes open for my next vlog! Until then…keep the rubber side down!


      Seweekspoort Peak And A New Kloofing Route

      Seweekspoort Peak And A New Kloofing Route

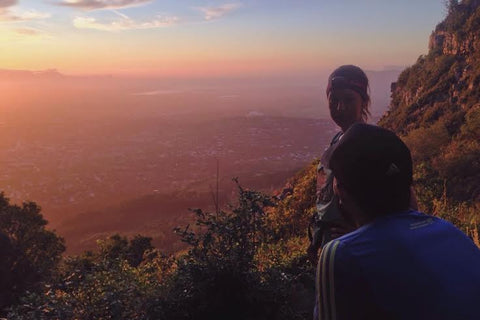
      “Have you hiked up Seweweekspoort Peak?...”. “No I haven’t! But I bumped into so many people who have either done it or are doing it, it’s not even funny…I am totally keen”. This is my favourite kind of friend; one who, in a heartbeat, will join me on any adventure. Three months later we still hadn’t planned much (or anything at all), but we were amped and ready to go. Our friend Martin had encouraged us to do the traverse (up to Seweweekspoort Peak, traverse along the side to Skull cave on Day 1 and then down via Towerkop on Day 2). What we gathered from the little bit of information that was available online, was that the northern approach is shorter, but more of a scramble. We decided on the southern approach due to convenient accommodation at Koedoeskloof near the base of Towerkop (at the western end of the traverse) and it would mean that we’d ascend and descend on the same side of the mountain.

      I am on an eternal quest to find a balance between comfort and hiking/running light. This is what I packed for the 2 days. The heaviest items were food (1.5 kg) and water (3 l). The rest was a sleeping bag and liner, warm kit and sleeping clothes (a luxury which I prefer to carry) (1.5 kg). Weather forecasts indicated 0 degrees Celsius for the evening. The latest addition to my kit was a fiery pair of full length tights from Siren Polewear; perfect for the overgrown first part of the trail. Everything fitted nicely into my UltrAspire Epic pack.

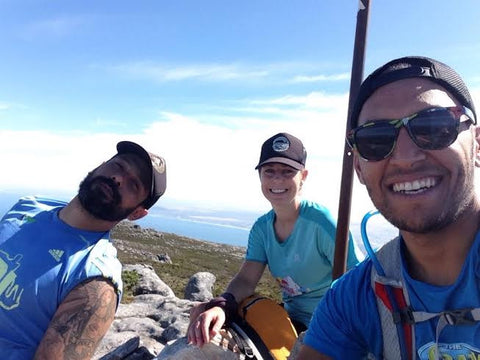
      As tends to happen with these group affairs, our numbers dwindled as the date drew nearer. Eventually, our motley little crew set off - Armand, Ghaleed, Jakob, Sabrina and I. One member in particular has built a long standing reputation for, well, you see…we spent the first part of our trip waiting for him, then finding out he would need to be picked up along the way, only to find that he was in fact waiting somewhere else, but at the same time was also busy buying some last minute items at Canal Walk. We eventually left Cape Town after 15:00 in peak Friday traffic. We then proceeded to look for this person at every garage stop after each of us had found our way back to the car. What a laugh.

      We arrived at Koedoeskloof Country Lodge at 20:30. Ghaleed and I set up our nifty little solo tents and we all tucked into burgers from the on-site restaurant. It was a warm night and I was incredibly cosy inside my Vango tent. We were staying near our planned finish, so we needed a ride to the start (25 km away). We agreed to meet at 06:30, in order to catch a ride with the owner. Somehow there was a miscommunication and I was very confused when I saw Ghaleed head to the showers a few minutes before I went down to meet the others. He was just as surprised to see me all packed up. Turns out he thought we’d be meeting at 07:30. With some muttering under our breath, we piled into the minivan.

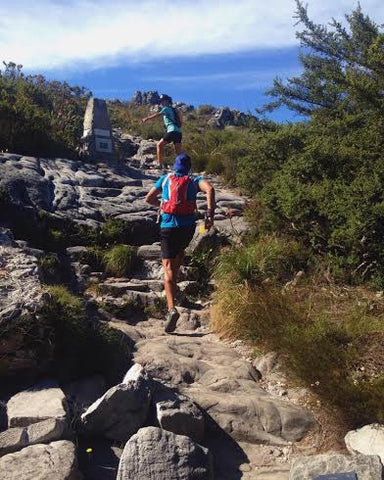
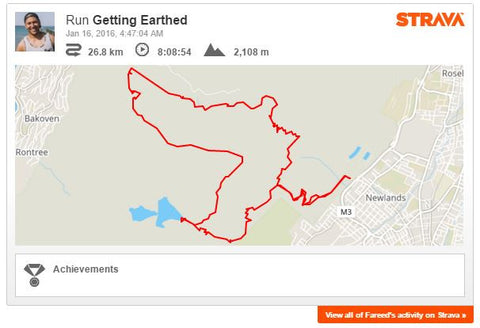
      It is about 1700 m of ascent from the start to the peak over a distance of approximately 13 km. Although someone was nice enough to set out white tape marking, the first part of the hike, involved some serious bundu bashing, leg scraping and blood drawing. Long pants/tights are recommended. 


      My SUUNTO Ambit Peak came in really handy because I had stored the POIs beforehand and I could easily get an indication of how far we were from various checkpoints. We used a combination of a really handy route description, two SUUNTOs, and a cellphone with a mapping app. Team work!

      Soon after we passed the rain gauge, Jakob realised that this hike was not going to be the type which culminated in dumplings and wine at the top; which is apparently what they do in his home town (Prague). Armand volunteered to go back down with him and we continued up to the cave. Ghaleed hung back and ate his lunch, while Sabrina and I pushed on. 

      It was incredibly cold at the cave. We pulled on everything we had while we waited. Armand had pretty much run back up and it wasn’t long before he was at the cave.  As we were about to leave for the summit, Ghaleed said that he would not be continuing with us, but that he would spend the night in the cave. Oh dear. I recalled people often saying that you should never split up on the mountain. Alas, for the second time that day, we left a member behind and pushed on, checking contours and coordinates every so often (all too often).

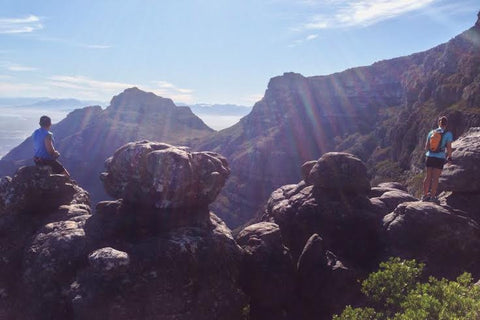
      The rest of the route was incredible. The views were fantastic and we chatted away as we hopped, skipped and boulder climbed to the top.

      After reaching the peak there were no more cairns and the weather looked ominous; the makings of a true adventure. 

      It was 17:00 and we had only covered 500 m in the hour after leaving the peak, because we first went along the ridgeline, reaching an impenetrable “bowl” and then dropped back down. We knew that we had to follow a generally westward direction, but my SUUNTO said we had 8 km to go and it all looked like boulder hopping on a slope. It was frustrating, because I knew that other people had done this before. I love technical trail, but decided I wasn’t having fun, we were low on water, and it seemed unlikely that we would reach Skull Cave before sunset. I told the rest that I was opting out. Someone mentioned burgers, beer, wine and sleeping in a warm bed, so we agreed to venture down the northern side of the mountain.

      I peered over the side of a ravine and declared that there was no way we were going down that way. Armand had other ideas. Look at this face!

      Possibly due to his lack of water (he had earlier jumped straight into a muddy mess), he exclaimed that it would be the “pudding to our main meal”. He may have been trying to recall a different saying. It could only be a mad man (or a thirsty man) who would think this ravine was a good idea. Nonetheless, Sabrina and I bounded down the slope.

      Fortunately, for all of us, it turned out to be the best decision of the day! It was absolutely beautiful and it made our aborted mission all worth it.

      We stepped out of the gorge, giddy with laughter and satisfied with our successful kloofing mission.

      We picked up signal for only an instant and Armand contacted Jakob. He would come and fetch us. We dropped a pin (iPhone perks) and started moving again. 

      Just as the sun was setting we approached a cluster of old houses straight out of a scene from “The Hills have Eyes”. A herd of cows spread out in a straight line started walking towards us, moo-ing loudly. We walked fast. They walked faster. We started trotting and soon they were running towards us. We raced around a bend and ran up to the main road. Flipping heck, what was this place?! Convinced that we were at risk of never picking up signal again, we ran up the road nearer to where we previously had signal, and it worked. It was dark by then, but Jakob was on his way racing through Seweweekspoort and soon we were on our way back to Koedoeskloof. What a day.

      We picked Ghaleed up the next morning and he looked mostly unscathed by his night in the wild. He even had photos of the fire he had made.

      A week later, Martin and some of our other friends managed to do the traverse in 5 days. Knowing what a challenge it is, I am now even more keen to go back.

      The following POIs for the Southern approach to the peak are suggested:

      Possibly leave cars at the farmer’s house: -33.480324, 21.383443 (call Mr. Gerrit Nel on 028-5611628 to get permission to do the hike)
      Start of the trial: -33.466652, 21.374454
      Hut1: -33.436390, 21.368547
      Raingauge: -33.422211, 21.369461
      Cave1: -33.403519, 21.369314 (*There is water here in the back of the cave)
      Seweweekpoort Peak: -33.398270, 21.367773

      The most useful site that we found for route information: https://sites.google.com/site/towerkopinfo/nearby-hiking-routes/seweweekspoort-peak-to-towerkop-traverse

      How To Create Epic Time Lapses With Your GoPro

      How To Create Epic Time Lapses With Your GoPro

      Timelapse photography is, put simply, a number of photos of the same scene, spread over a period of time, and squeezed into a video. The video is played back in a shorter amount of time, enabling others to see changes in a landscape over the natural progression of time while not having to wait through the actual length of it.

      Whether it’s bustling streets in the city or clouds gliding and twisting over a landscape, timelapse photography tells a much greater story about a place than any single image could.

      Thanks to the GoPro’s built-in functionality, timelapses are incredibly easy to shoot and simple to edit using GoPro Studio, which you can download on your computer for free here.

       4 steps to creating epic time lapses with your GoPro:

      (First things first, make sure your GoPro is fully charged and that you have a lot of free space on your SD card.)

      1. Choosing the right interval

      Your interval depends on what you’re shooting. GoPro allows you to choose from a 0,5 second interval to a 60 second interval which you can change in the settings. You have to see how fast or slow your subject is moving to choose the best interval for the situation. For example, a sunrise happens quite slowly so a 10 second interval would work better than a 2 second interval as there is no major visible change in the sky in that period of time. Your shorter intervals would be used for shooting a busy street or crowds of people at rush hour.

      TIP: Keep in mind that the smaller the interval, the smoother your time lapse will turn out and the longer the duration.

      2. Setting up the shot

      Your GoPro's role when creating timelapses is very different to when it's mounted on your surfboard, capturing you pumping at full speed through Pipeline-sized barrels (or so you wish!). For your timelapse to be effective, your GoPro must be firmly mounted perfectly still for a duration of time.

      It’s important to use the right GoPro accessories to keep your camera as stable as possible. You don’t want your timelapse to be ruined because your camera wasn’t in a fixed position or a gust of wind knocked it over. Some great accessories are the GoPro 3 Way mount, the JOBY Action Tripod mount and, if you’re looking for something more affordable, the WOH Tri-Arm XL.

      In the video below, I had my GoPro mounted on an extendable pole which I stuck in the sand. You’ll notice that the camera moves slightly because it wasn’t stable enough. Using a stronger tripod would have given perfectly smooth results.

      Early Morning at Cave Rock from Natalie dos Santos on Vimeo.

      Tripods are small, light and easy to set up wherever you want to do your timelapse. They’ll allow you to get new vantage points as you can set them up on just about any surface.If you’re lucky enough to have a GoPro 4 with an LCD screen on the back, setting up your timelapse is a whole lot easier. If not, the GoPro smartphone App allows you to control your GoPro from your smartphone using WiFi. This makes it easier to frame your shot.

      (TIP: Turn off your GoPro’s WiFi once you start shooting to save its battery.)

      The framing of your shot is the most important part of any timelapse. Try capture some sort of movement like people walking, trees swaying in the breeze, or my personal favourite; clouds moving at sunrise or sunset.

      3. Shoot.

      Now that you’ve selected an interval and attached your GoPro to your tripod, you can click the shutter button, sit back and relax. A red light will flash on your GoPro at every time interval you selected. Don’t move your camera at all while it’s shooting and wait until the sun has risen completely or rush hour is over until you turn it off.

      4. Editing

      Connect your GoPro to your computer and you should find a couple hundred images depending on how long you were shooting for.

      Open GoPro Studio and import all of the images, selecting them all at once. Convert them and proceed to step two to edit your video. I like to add music to my timelapses and adjust the speed of the timelapse to go wth the music. Add a song, play the timelapse and split it into clips to change the speed. Keeping the timelapse at its normal speed looks pretty good too.

      Now you can export your timelapse and marvel at your creation!

      Same old Rock, different day. from Natalie dos Santos on Vimeo.

      Getting Earthed

      Getting Earthed

      Eight hours in the mountains, licking rocks, drinking from streams and swimming in dams – that was one helluva LSD…

      Earthing or grounding is a practice which claims to provide health benefits as a result of being in direct physical contact with the ground. When you head out onto Table Mountain for an 8 hour LSD, you are sure to get grounded.

      It was also the first time that I’d be meeting Donnie, and a long run was the perfect way to get to know someone.

      Tammy, Donnie and I started from a dark Newlands Forest at 5am. A few short-cuts across the trails and we hit the boarded area of the Contour Path.

      The plan was to climb Newlands Ravine, rejoin the Contour Path below Devil’s Peak (via the Saddle) and then run over to India Venster. After India Venster, we would then run to Maclear’s Beacon, follow Smuts Track to the Hely-Hutchinson Reservoir, descend via Skeleton Gorge and then back via the Contour Path to the car park at Newlands Forest. In a nutshell, klap every landmark on Table Mountain – I’m gonna need to pack my power bank 

      I’m sure when I logged the route via the @SafetyMountain group there were a few head shakes lol

       The sun was rising when we hit Newlands Ravine with pinks, yellows and blues streaking across the sky.

      We had exchanged the initial pleasantries by the time we reached the top. On the way down from the Saddle is when Donnie started breaking out his stories of events and races past – aka the good stuff

      Although the trail running community in Cape Town is relatively large, the numbers of experienced runners who’ve done the longer distance events are low. The stories from Donnie were welcomed as you don’t often run with people who can share details from races as well as valuable training tips.

      The scrambling sections on the India Venster route are not the simplest. So when you see a barefooted hiker making their way to Kloof Corner Ridge via the same route (that you just managed to psyche yourself up for) then your definition for hardcore quickly gets re-evaluated!

      He introduced himself as Phakamisa and regularly hikes barefooted. Ascribing to the Earthing school of thought, he believes in the idea of regular separation from our reliance on digital devices and heads to the mountain as a retreat. I’m sure our paths will cross again

      After tagging Maclear’s Beacon, we followed Smuts Track to the dams. I’m not sure if we could blame prolonged exposure to the sun, but while breaking on Smuts Track, the question came up of “What the rocks would taste like”…

      Now at this point the weird alarm should’ve been going off in my head, but maybe the long run was playing some tricks on my better judgement. Before I knew it, I was joining the others in some rock tasting – face-palm moment lol

      And… It tasted like dirt. No surprises there lol

      With my own Earthing initiation now complete (I was so sure that I was being Punk’d), we took an extended break at the Hely-Hutchinson Reservoir including a swim and some snacks.

      A tricky descent down Skeleton Gorge (I slipped and cut my left thumb), then a quick run back to Newlands Forest along the Contour Path and we were back at the car park.

      Trail running, wise men, mountain obsession and only a cut on my left thumb as the cost. I was now Earthed 

      If you’ve spent some time getting completely engrossed in the mountains, please share your experiences in the comments section below.